Hello friends of E-Arena.gr!
Today we will make a lancache on our Synology NAS via Portainer GUI!
To begin with, you must follow this excellent guide from Marius here.
Once you have followed the instructions of Marius and you have the Portainer GUI up and running and you are logged in to your Portainer GUI you can continue this guide.
I have to give massive shoutout to Marius for this amazing work!
Most of my work here is based on his work with a touch of mine :)
A few notes, your Synology NAS must not run any other service using the port 53 in UDP nor in TCP protocols, also make sure TCP ports 80 and 443 are available and no other service is using them.
Next thing to note, you will have to config either ALL of your pcs/servers/mobiles/laptops manual to use as DNS the IP of your Synology NAS OR you will have to set your router to serve the IP of your Synology NAS as DNS to every device via DHCP. Please check the manual of your router on how to do that.
Also an advice, due to lots of traffic going into your NAS, things can slow down in the network, so make a VM running pihole, make pihole your default DNS server and config pihole to use as upstream DNS the IP of your Synology NAS. This way you will get much less ads in general and your NAS won’t have that much stress on the CPU!
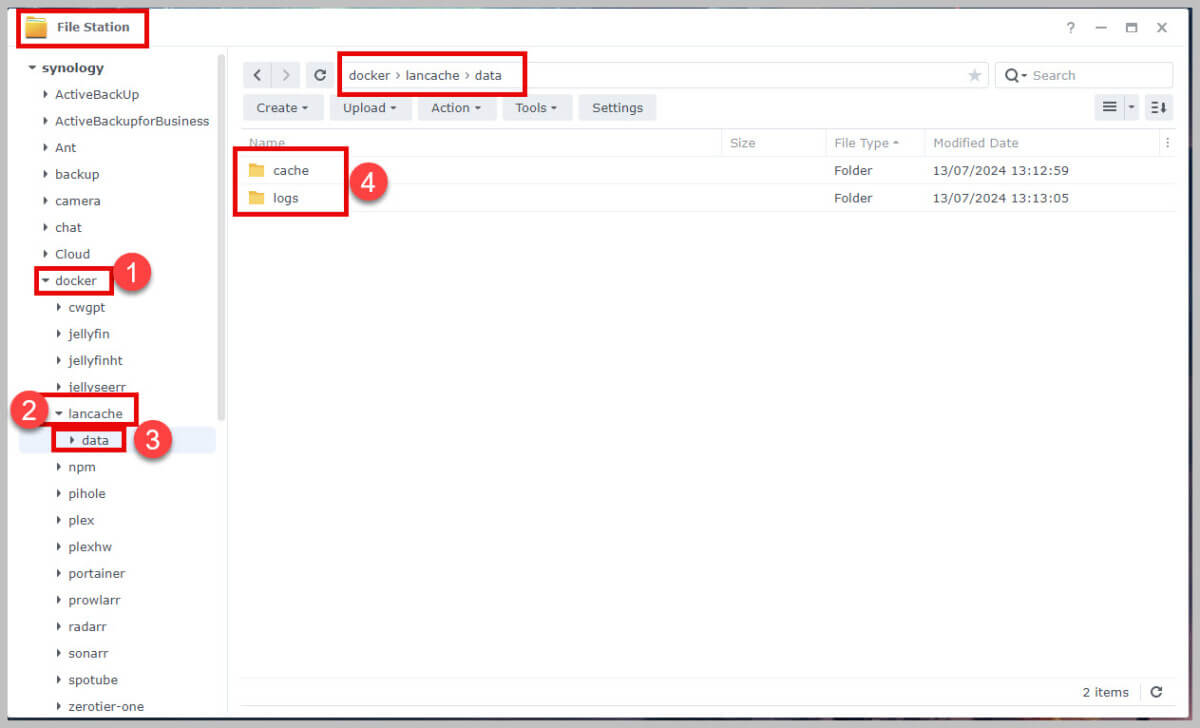
So now we go to our Synology NAS and our “File Station” app, I suppose you have done Marius’ guide and you do have a “docker” folder already, if not, please check his guide one more time!!! If you do have the docker folder perfect! Open it and create in it another folder with the name “lancache”. Once that folder is made, open it and create in that folder 2 more folders with the names “cache” and “logs” and you will have a pic similar to this:
 When you are done with that, switch to your Portainer GUI and go to “Stacks” and create a new stack. Name it “lancache” and
Paste the code bellow:
version: '3.9'

x-restart-policy: &restart-policy "always"

services:
  dns:
    image: lancachenet/lancache-dns:latest
    container_name: lancache-dns
    restart: *restart-policy
    environment:
      - USE_GENERIC_CACHE=true
      - UPSTREAM_DNS=1.1.1.1  # or your preferred DNS server
    ports:
      - "53:53/udp"
      - "53:53/tcp"
    networks:
      - lancache

  monolithic:
    image: lancachenet/monolithic:latest
    container_name: monolithic
    restart: *restart-policy
    ports:
      - "80:80/tcp"
      - "443:443/tcp"
    volumes:
      - /volume1/docker/lancache/data/cache:/data/cache
      - /volume1/docker/lancache/data/logs:/data/logs
    environment:
      - CACHE_DISK_SIZE=1000G  # Example for disk cache size
    networks:
      - lancache

networks:
  lancache:
    driver: bridge
And hit “Deploy the stack” under the window you just pasted the code. Wait for your NAS to download the packages and install them. It can take a while depending on your internet speed and how loaded your NAS is.
Enjoy!
